Pressed Flower Necklace for St. Patty's Day-TUTORIAL
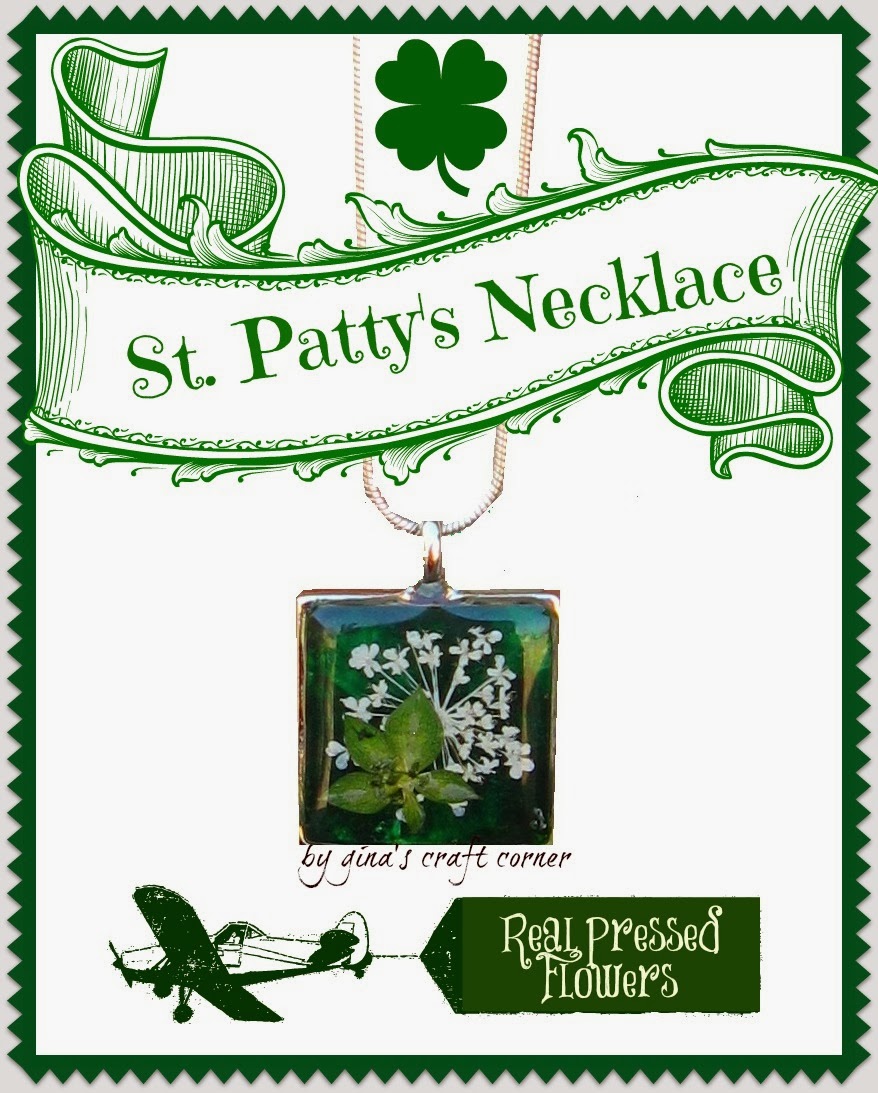

I really was not expecting to have a 'St. Patrick's Day' themed post, but every time I look at this necklace it just makes me think of March, so I had to share.
I've had this necklace for about 4 years now. It is made with some dyed green Hydrangeas, white Queen Anne's Lace and another flower/leaf I just cannot remember.
Do you want to make one? It is really simple. I was just going to show you my St. Patty's necklace, but I decided that I would do a short tutorial for you in case you ever feel like making one.
First, you will need to gather your supplies.

Bezels- purchase these at your local craft store in the jewelry making aisle
Chain-also at your local craft store
Tweezers-for handling delicate flowers
Pressed flowers-Here is a great source
Lighter
Toothpicks
UV Light (Sun or a light box)
Magic Glos by Lisa Pavelka-This seals in your flowers (here is one on Amazon)

Step 1: add a small amount of Magic Glos to bezel and spread around w/ tip

Step 2: Use tweezers to carefully lay out a background. Here I'm using dyed hydrangea petals. As you place the petals in the gloss the tops of the petals will be getting a thing layer of glos on them as well. That is good.

Once you have covered as much of the area as you can you then need to place it in UV light.

Step 3: Place in UV light box or outside in the direct sun to harden the Magic Glos (~15min)

Step 4: Add more flowers to cover up the edges or any bare spots that your first layer did not cover. I like to put down a few drops Magic Glos first and then add the flowers. This is where you will want to use the toothpick to keep your flowers in place as you add them. Try to get a layer of the Magic Glos over the entire surface so that is is just covered. We want to build the layers slowly.
Step 5: This is when I use a lighter to carefully wave back and forth over the surface. This process will pop any air bubbles that may be on the surface. This step is VERY IMPORTANT!
Step 6: Place back in the UV light for 15 more minutes.

This is what mine looked like at this stage. Not so pretty, but don't worry!

Step 7: Add a centerpiece flower. Once again, I do not know the name, but isn't she cute? I think it looks like a little ballerina.
Step 8: At this stage I fill the bezel with the Magic Glos so that the entire surface is covered. I also tilt the bezel side to side to let the gloss slide into the corners and edge (don't spill!).
Step 9: Use the lighter to pop the air bubbles.
Step 10: Place under UV light for another 15 minutes.
If it looks like any of your flowers are not perfectly covered or if your surface just does not look level, then add another small layer of gloss until you are happy with the results.


So here it is! I like the Magic Glos because it gives a dome effect. I'm really pleased with this necklace! I hope you give it a try. These necklaces make great gifts and they come together really fast as long as you have all the supplies gathered up ahead of time.
I have a TON of empty pendants lying around so I'm thinking about trying something different with the ones I have left. I just saw on Pinterest a pendant with a map section cut out focused on a specific city. I think I might have to try it. Here's the Etsy site of the lady I got the idea from. More than likely she does not use Magic Glos, but I'll give it a go and let you know what I come up with.
Thanks for stopping by today! I also wanted to let you know I have a GIVEAWAY going on right now..
Blessings,
Gina

Comments
Post a Comment
I LOVE..LOVE...LOVE...comments from you! It truly makes my day! So, leave a comment AND your webpage or social media link and I will get back with you. Thanks in advance!!
~Gina