This week at Gina's Craft Corner I am concentrating on Pillow Making. My first post in this series was a
Doodle Stitched Butterfly Pillow. Today I will be showing you how to use string/yarn to design your own fabric for a very artsy looking pillow. It's also a lot of fun to make, so let's get started!
MATERIALS:
*2, 16"X24" pieces of cotton fabric (I used a cream color)
*Cardboard at least 16"x24"
*String or yarn
*Newspaper
*Krylon Fusion spray paint (I used blue)
*Scissors
*Sewing Machine
*Thread
*Pillow Stuffing
*Needles (jean needle for sewing on flower)
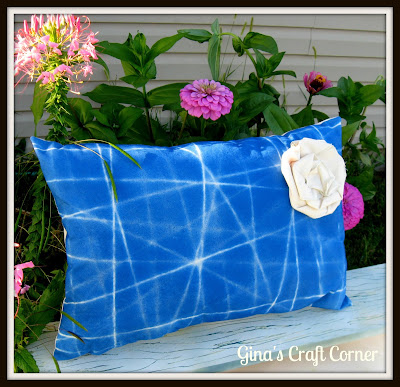
1. Place your fabric on your cardboard and begin wrapping your little heart out. I tied in the back and in some places I secured with painters tape.
2. I did this late at night in my garage, but you really should do this outside where there is some air circulation. Let the paint dry.
3. Once the fabric is dry, remove all of the string and voila! Doesn't it look cool?!
I saw this idea in a book called,
The Big-(3 letter word) Book of Home Decor, by Mark Montano. In the book the pillow
design was complete at this stage and all you had to do was sew it together and stuff. But I thought it looked a little boring, to be honest. So, I wanted to add a big flower to the corner.
4. I had some more fabric left over, so I cut a strip 6" wide (I don't know how long). It's needs to be long enough to wrap into a flower. You can see where I had to zig-zag stitch the edge so it would not fray. I need to buy some pinking sheers! Although, I kind of like the way the zig-zag stitch adds a little color and another dimension to the flower.
5. Fold the strip in 1/2 a couple of times and then start stitching and sewing as you turn and twist and turn and twist until you have a flower! I saw this technique in an Etsy Class I'm taking. If you are interested in the class I'm talking about you can see it
HERE. (If you choose to purchase this class I will be compensated)
5. All that is left now is to sew the pillow together. Use a 1/2" seam allowance on all sides and clip those corners, but DON'T FORGET....
leave a 5" opening at the bottom for turning your pillow right side out.
6. All that is left is to stuff your pillow and then stitch that little opening closed with hand stitching (gasp!). Yes, I did hand stitching and I survived.
7. The last step is to show it off to all your friends! I just LOVE how this pillow turned out. I did not stuff my Butterfly Pillow enough, so I was sure to stuff this puppy to the hilt.
So what do you think? Wouldn't this fabric look great on a bag or for a bulletin board background? Maybe a shirt or a skirt? I don't know, I'm just lovin' it! And the flower, I can't wait to try it out on a bag!
To see more painted fabric pillows click
here.
Thanks for stopping by Gina's Craft Corner today!! Feel free to take off your shoes and stay a while! You can follow me by clicking on the purple social buttons or by signing up to receive e-mails when I post something new.
~Blessings,
Gina
If you like to design your own fabric, you might also like these post...
Linking up here...


Comments
Post a Comment
I LOVE..LOVE...LOVE...comments from you! It truly makes my day! So, leave a comment AND your webpage or social media link and I will get back with you. Thanks in advance!!
~Gina