10 Easy Ways to Handprint Your Own Fabric


I had the opportunity to spend about three hours in Barnes and Noble last week just looking at sewing and fabric books. I was in heaven! I had 5 books that I was looking over and a theme was building...fabric design. I seem to be drawn to fabric design, if you haven't noticed. I know absolutely nothing about it, but I believe you are never too old to learn something new. The whole purpose of this blog is to record this journey I am on in learning to sew and whatever goes along with that. If you are interested in learning something new and having fun along the way, then keep reading!!
GOALS FOR THIS PROJECT
1. Find interesting objects around the house that could be stamped onto fabric.
2. Determine which stamps would be best to design a larger piece of fabric for sewing a bag.
SUPPLIES/MATERIALS:

You will need the supplies above in order to do some of the stamping in this project. Gather all of your supplies before you begin. The fabric paint dries quickly, so it's best to have everything set up before you begin. You should also have a wash bucket ready with soap and water to throw your stamps or brushes in to wash as soon as you are finished with them. The paint dries quickly, but if you wash the stamps soon enough you'll be able to reuse them.
Fabric Paint: I purchased this fabric paint from Wal-Mart. They have many colors to choose from. One bottle of red was all I was willing to splurge for. Now that I know how much fun this is, I plan on buying some additional colors.
X-Acto Knife: You will need the X-Acto knife if you decide to make a stamp with foam craft sheets. I also use it for cutting the end off of a swimming noodle.
Q-Tips: These will be used for the Monotype Printing w/ Plexiglas. It is used to draw your design on the painted Plexiglas.
Paint Brushes: I used the brushes to spread the the paint over the stamping objects. The sponge brush seemed to work the best for me. The roller was used for the Monotype Printing w/ Plexiglas (although you are supposed to use a Brayer- a rubber roller used to spread ink, this is all I had).
Fabric: Some good fabric choices for hand printing that I have used, and that are widely available, are Broadcloth, Linen and Muslin.
I found ten items around my house that I thought would be perfect for this project.
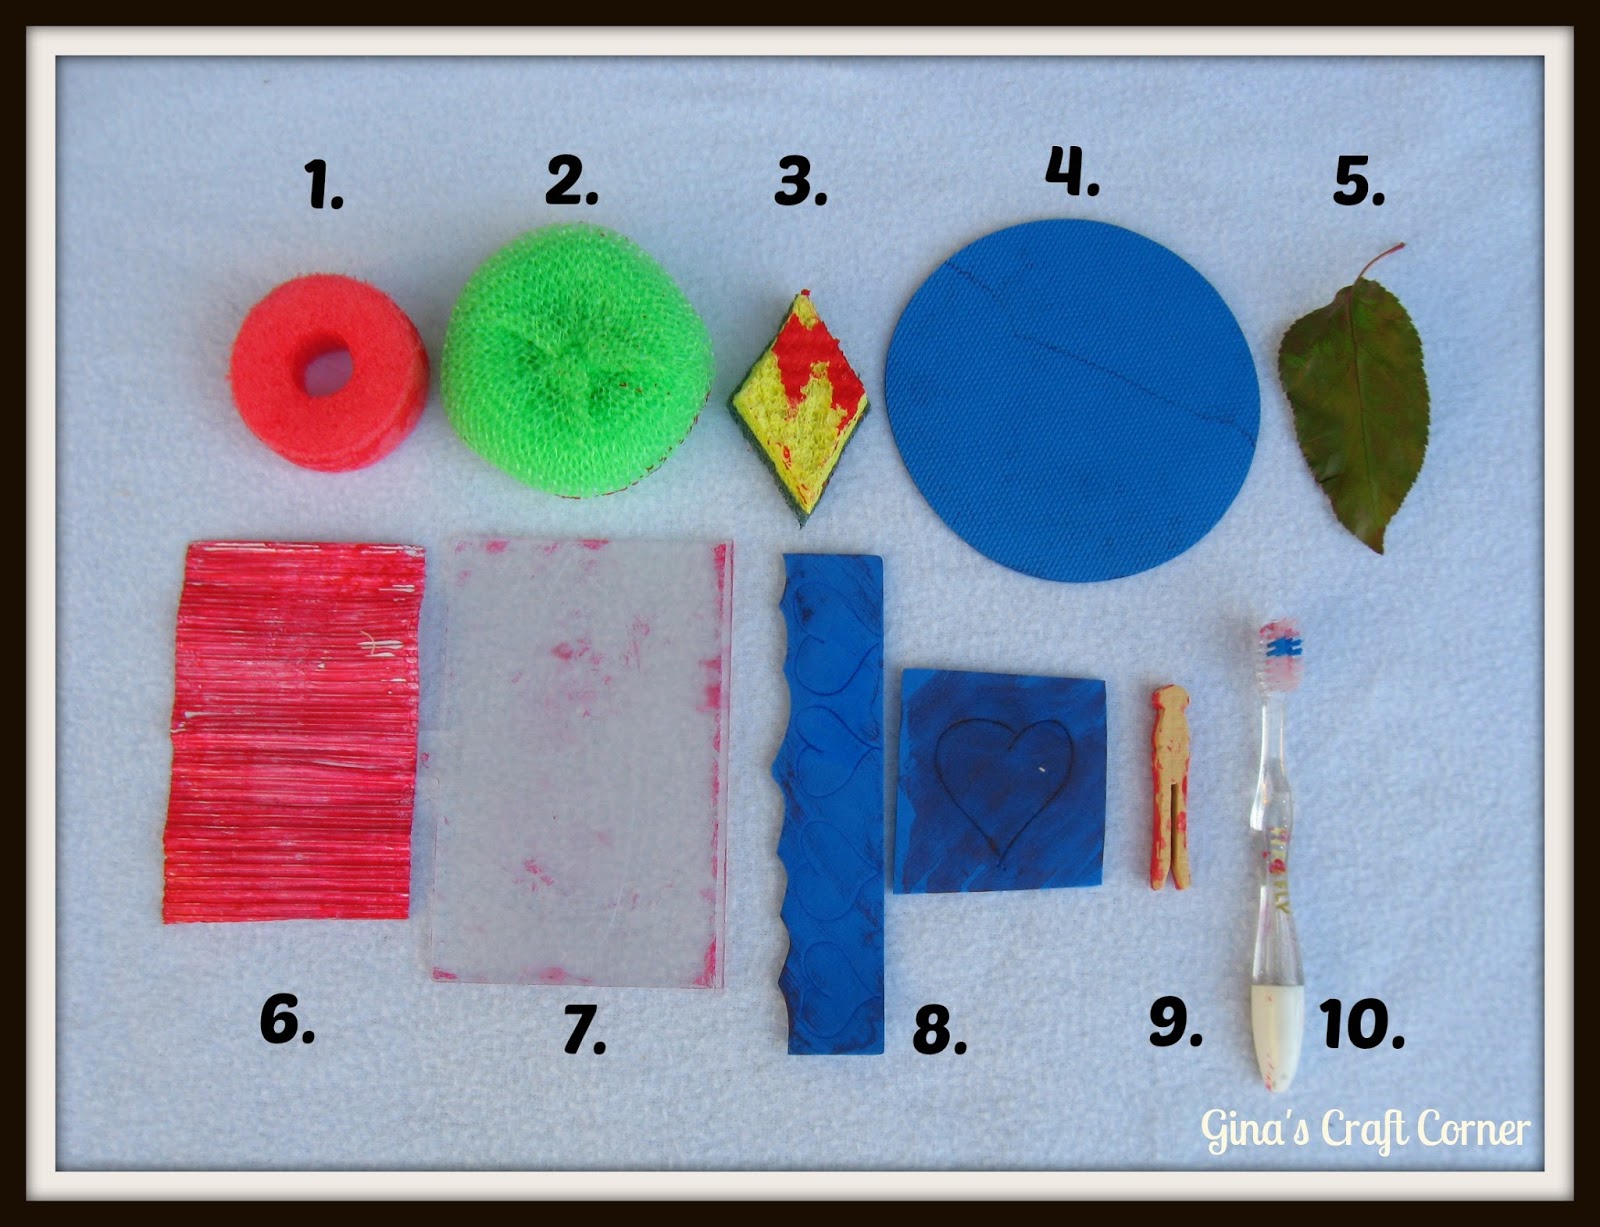
Below, you can see how each item performed on the fabric.


Which one is your favorite? I'm really liking #1, the swimming noodle stamp and #2, the mesh scrubber. At first I thought #1 looked like a doughnut, then lifesavers, and now all I can see are red blood cells. The scientist in my...I guess?? :)
The 3rd stamp was from a sponge cut into a diamond shape. This was actually the one stamp I had tried before on a 'Love Pillow' I posted about recently. You could cut the sponge into any shape you like to create different effects.
For #'s 4, 5, 6 and 9, I simply brushed the paint onto the material with a small paint brush. Be sure to wipe the edges where the paint might be thick, so you get a nice crisp edge.
For #'s 1, 3, 5 and 10, I had a plate with a very small amount of paint and tapped these items into the paint, removed excess by dabbing onto another piece of cloth, if desired, and then stamped onto fabric.
#9 was a stamp made from a very thin craft foam sheet. I used a pen to draw my design and then used the small paintbrush to cover the the stamp. I liked that you could see the paint strokes over the heart. I also did a row of hearts and a butterfly that you can see below.


You could also use your x-acto knife to cut out your shape so that you would have a nice clean print of your heart or butterfly. This would be easy for kids. They could easily cut out the foam sheet into any shape they want, paint it and stamp. To make it easier for them, just glue their cut-out design onto a stiff piece of cardboard or onto a wood block for easier handling.
Lastly, I want to talk about #7, the Monotype Printing with Plexiglas. I first saw this technique in a book titled Sew Wild: Creating with Stitch and Mixed Media by Alisa Burke. I have talked about this book a lot, and have tried many of her techniques discussed in her book. If you love working with mixed media or have an interest in designing your own fabric, you should definitely check it out.
Monotype Printing is where you draw or paint on a smooth nonabsorbant surface with ink or paint. I simply found a piece of clear plastic that used to be a lid to a crayon container, coated it with my fabric paint using my little roller paint brush, and then began using a Q-tip to draw a design onto the plastic plate. As I'm drawing with the Q-tip I am removing the paint and a pattern if forming. You then take that plate and press it onto your fabric and voila! You have your unique design printed onto your fabric. Pretty cool! I would like to get a BIG piece of Plexiglas and a brayer and try this again on a larger piece of fabric. My plastic piece was really small, and it also had a tiny lip on one end so that when I pressed it down on my fabric, it was not pressing completely flat. You can see that in the picture above (#7).
CONCLUSION
This was a lot of fun! I am excited to pick a couple of these to do on a larger piece of fabric! I liked them all, but I just really love those perfect circles made by the swimming noodle and the star shape made by the scrubber. I think you'll be seeing both of those very soon in a new sewing project. :)
WANT TO SEE WHAT I MADE WITH ALL OF THIS HAND PRINTED FABRIC???
FUTURE POST
I have some more stamping experiments to try. In a future post I will show you how to carve your own stamps using items like a potato (very common and easy method most people have tried or at least heard of) designing your own lino blocks and how to create your very own rubber eraser stamps. It should be fun! I hope you will join me!!
DON'T MISS A POST
You can sign up to receive a post every time I post something new by subscribing via e-mail. You can also simply click on one of the purple buttons to follow me any way you like. :)
COMMENT UPDATE!!
I recently realized that Blogger only allows Google+ people to comment on my account. If you would like to comment, but are not a Google+ gal or guy, then I have good news! You can now scroll past the google comment box and you should find a FACEBOOK comment section. :)
Thanks for stopping by! Have a great week!
Blessings,
~Gina
This project was featured at these great blogs....


CLICK HERE TO SEE ALL THE GREAT PARTIES I'LL BE LINKING UP TO

Comments
Post a Comment
I LOVE..LOVE...LOVE...comments from you! It truly makes my day! So, leave a comment AND your webpage or social media link and I will get back with you. Thanks in advance!!
~Gina